intro
sidebar_position: 1
How to Use the justallmylink System
Welcome to the justallmylink tutorial. This guide will help you navigate through the system and make the most of its features.
Table of Contents
Accessing the Dashboard
Once you log in, you will see the main dashboard. Here's a quick overview of the sidebar menu:

Menu Options
- Home: Takes you to the main dashboard.
- Links: View and create your redirect links.
- Billing: Manage your billing information.
- Settings: Configure your account settings.
- FAQ: Access frequently asked questions.
- Discord: Join our community on Discord for support and discussions.
Configuring Your Endpoint
To start, click on Links in the sidebar menu. This will take you to the links management page where you can see your existing links and create new ones.

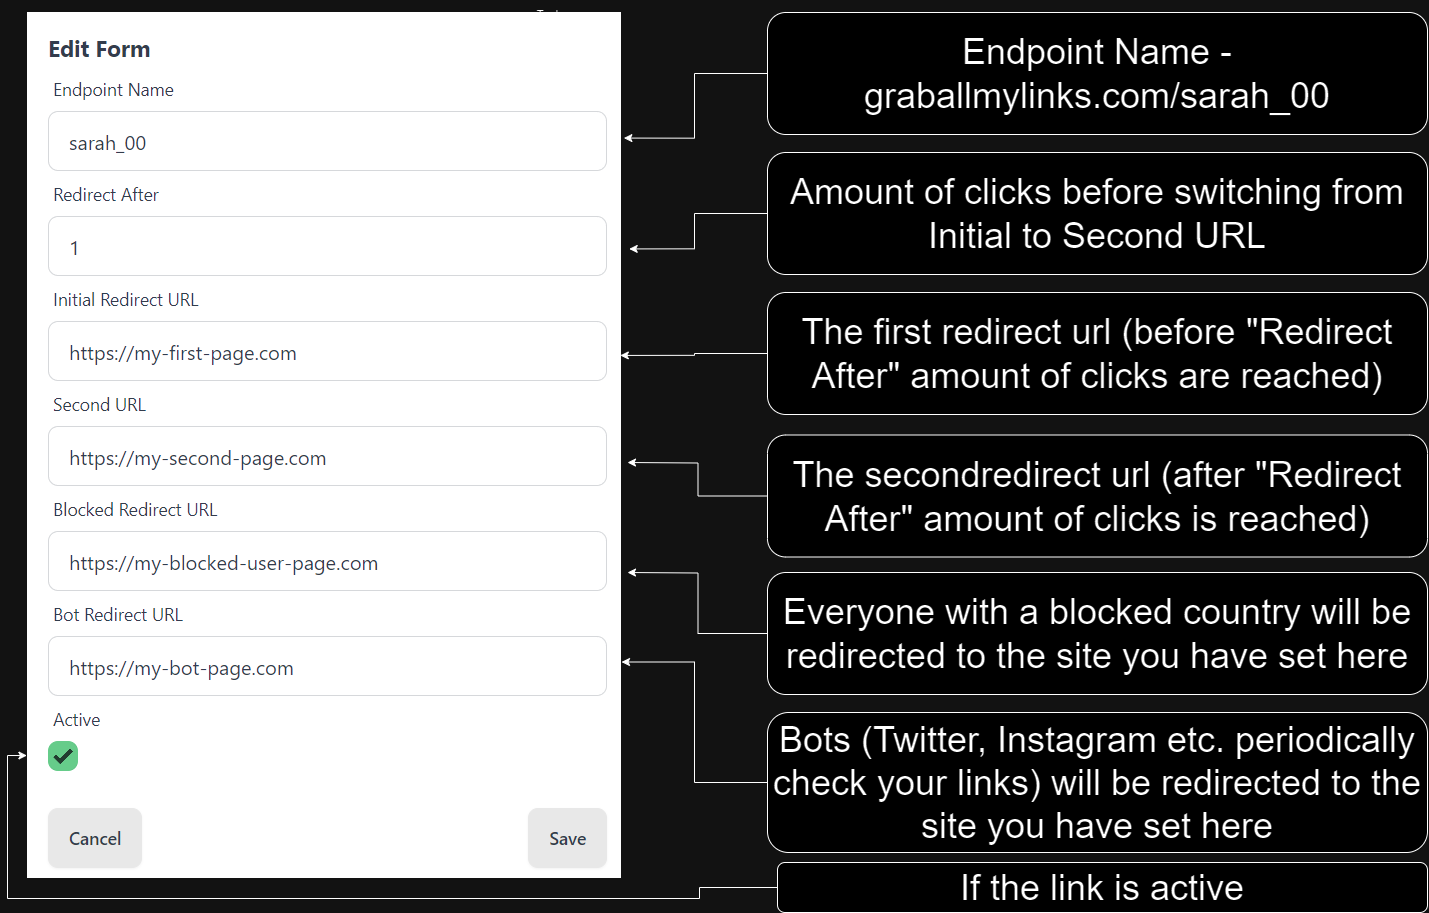
Edit Form
Here’s how to configure your redirect settings:
- Endpoint Name: This is the unique name for your endpoint. For example,
sarah_00. - Redirect After: Specify the number of clicks after which the system should switch from the initial redirect URL to the second URL.
- Initial Redirect URL: Enter the URL for the initial redirection.
- Second URL: Enter the URL for redirection after the specified number of clicks.
- Blocked Redirect URL: Enter the URL for users from blocked countries.
- Bot Redirect URL: Enter the URL for bots.
- Active: Ensure this checkbox is checked to make the link active.
- Save: Click the Save button to apply your settings.
Detailed Steps
-
Set the Endpoint Name
- Choose a unique and descriptive name for your endpoint.
- Example:
sarah_00.
-
Define the Redirect Criteria
- Redirect After: Enter the number of clicks that will trigger the switch from the initial URL to the second URL.
- Example: If you enter
1, the switch will occur after the first click.
- Example: If you enter
- Redirect After: Enter the number of clicks that will trigger the switch from the initial URL to the second URL.
-
Set the Initial Redirect URL
- Enter the URL for initial redirection.
- Example:
https://my-first-page.com.
-
Set the Second URL
- Enter the URL for redirection after the specified number of clicks.
- Example:
https://my-second-page.com.
-
Configure the Blocked Redirect URL
- Enter the URL for users from blocked countries.
- Example:
https://my-blocked-user-page.com.
-
Configure the Bot Redirect URL
- Enter the URL for bots.
- Example:
https://my-bot-page.com.
-
Activate the Link
- Ensure the Active checkbox is checked.
-
Save Your Settings
- Click on the Save button to apply your configurations.
Managing Your Links
Once your endpoint is set up, you can share the link https://graballmylinks.com/sarah_00 or https://uncoverallmylinks.com/sarah_00 with your users. The system will manage the redirections based on your settings automatically.
- Initial Visits: Users will be redirected to the Initial Redirect URL.
- After Specified Clicks: Users will be redirected to the Second URL.
- Blocked Countries: Users from blocked countries will be redirected to the Blocked Redirect URL.
- Bots: Bots will be redirected to the Bot Redirect URL.
Tips for Effective Use
- Testing: Before sharing your link, test it to ensure all redirects work as expected.
- Monitoring: Keep track of the number of clicks to understand user behavior.
- Updating URLs: You can update the URLs at any time using the Edit Form.